Just about everyone seems to have 1 started a WordPress blog at some stage. But just about everybody – those that don�t hire the services of a pro to do it for them – makes their website look, well, icky.
It doesn�t have to be that way though. At least, not if you follow the steps below…
Step 1: Do keyword research
Before you do anything with regards to your WordPress blog, you need to determine the main keywords you�re going to use on your site. The reason why you need to do this step before all else, is because you�re likely to need your main keywords to configure the settings.
You�ll also need keywords before you start adding any content to your site.
Backlinko offers a complete guide to doing keyword research, but for the sake of brevity, you can use a tool like Google Keyword Planner to conduct research.
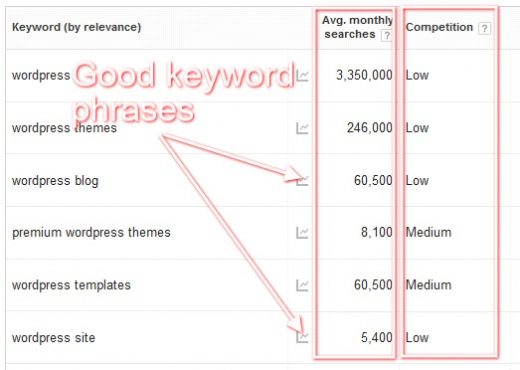
Base your selection of keywords on:
High volume of traffic using a search term +
Low amount of competition trying to rank for the search term +
Relevance of keyword
Never choose one word for keywords; it should have at least two words, and three is best.
Step 2: Configure the WordPress settings
Enter your WordPress blog login details. You should see the dashboard on the left, with these main areas:
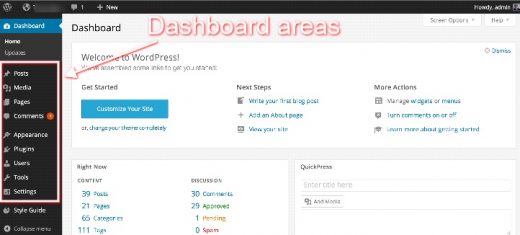
Posts: create a new blog post.
Media: the library to store images, videos, and audio files.
Pages: create and edit new permanent pages (these pages are the ones that go in the navigation area. These pages would include �About Us�, �Services� or �Contact Us�).
Comments: manage comments left by visitors.
Appearance: change how your WordPress blog looks.
Plugins: install and manage plugins (plugins add extra functions to WordPress websites).
Settings: set your site�s title and tagline and other important information.
This 8 beginner�s WordPress configuration guide, can help if you get confused.
Step 3: Install important plugins
Plugins add functionality to your WordPress blog. There are tons to choose from, and as you get into it, you�ll imagine ways of doing things better, and then you can search for a plugin to use to incorporate that particular function.
You could add a plugin that allows you to create a membership website, or a plugin that adds pricing tables, or a plugin that allows you to integrate with a third party. You get the picture, right?
There are many free plugins, and some which you pay for. But for now, we want to focus on installing four free plugins that are considered essential for the health of your site:
- SEO plugin – guides you in adding search engine optimized elements into your content.
- WPSmush plugin �- compresses the images you add so that your blog won�t take long to load.
- Anti comment spam plugin – manages junky comments made on your site so that you don�t have to.
- Social share plugin – adds social share buttons to your content to encourage visitors to share to their social media pages.
Once you�ve selected the plugins you want to add, you can install them in two different ways:
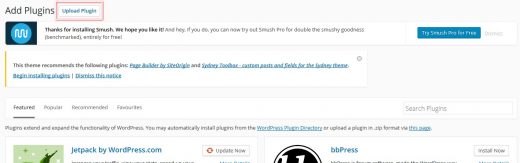
- Download the plugin directly from the creator, and then install through your WordPress blog dashboard by going to �Plugins – Install New� (make sure the downloaded plugin is in .zip format for uploading):
- The second way of installing a plugin is by doing a search for it from your dashboard, and installing it by clicking, �Install now� when you�ve located it. It�s a good idea to check that the plugin of your choice is compatible with your version of WordPress, otherwise it�s possible to break your blog.
Step 4: Choose a theme
The theme is what makes a website look the way it does. There are so many to choose from, free and premium, that it can make your head spin!
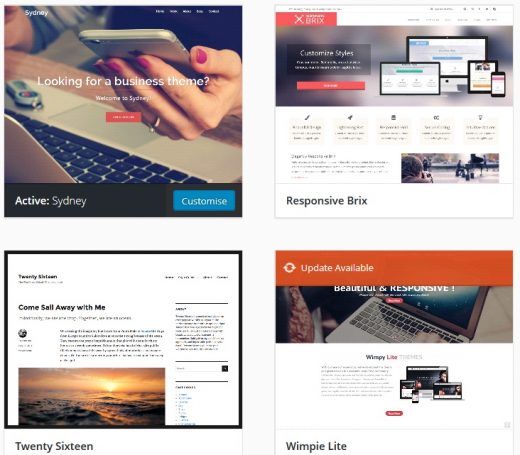
These are all free WordPress themes
Before you choose a theme, be cognizant of these factors:
- Know the goal of your WordPress blog. Different themes allow different functions, and if you don�t know what you want to actually do with your blog, you could end up with a beautiful theme that doesn�t perform well according to what you want to achieve.
- Make sure the theme you choose says it�s SEO friendly. Themes are created by all different people who have different skill-sets, so many themes are not SEO friendly. And if they are not SEO friendly, you�re not likely to get as much – or any traffic – at all.
- A theme may not always look the same as you first saw it, compared to when it�s installed and activated on your site. This can be due to a number of reasons, like images not being included, etc.
To change a theme in WordPress, go to �Appearance – Themes – Add New�. You can either search through the themes WordPress suggests from your dashboard, or find one via a search engine and download and install it just as you would a plugin.
Step 5: Customize the appearance
Once you�ve installed the theme of your choice, you can customize it, remembering that not all themes allow you to customize certain elements. For instance, one theme may allow you to add a logo, but another may not.
Check what the theme allows by going to �Appearance – Customize�. It should bring up options on the left, like this theme does:

This particular theme allows for many customizations, but other WordPress themes may not
Step 6: Add SEO optimized content
Finally it�s time to add content, and if you want your WordPress blog to do well in user searches via search engines, your content should be search engine optimized. You will use the keywords you decided on in step 1 of this post, in the content and when you upload images.
The SEO plugin you installed in step 3 will help guide you with this, but you may still get confused, so it would be beneficial to understand on-page SEO before you compile your first blog post.
In summary
You don�t need to pay a pro to set up your WordPress blog. The steps below take you through what you need to do to set up your site properly:
Step 1: Decide on the main keywords to use
Step 2: configure WordPress settings
Step 3: Add essential plugins
Step 4: Change how your site looks
Step 5: Customize the appearance of the theme
Step 6: Add optimized content